

Sooo I'm a little late on this post (as always). Sorry to those I told that I would have it up within a week! The main reason for the delay however is because I was having a hard time sealing my island with polycrylic without it looking like a streaky mess. Those who have tried to use clear gloss polycrylic on a large surface probably feel my pain. It ain't easy!
So therefore I took to the web and tried literally every different technique of applying it that I could find in hopes that I could remedy the situation prior to writing this post (and therefore save you guys the hassle while simultaneously making myself seem awesome and like I actually know what I'm doing). Sadly enough, I still haven't found a solution.
No bueno, I know.
But I still learned some pretty good tricks I'll share with you. And once I find a solution to that pesky little streaking problem I'll be sure to post an update. If you don't have an island, you probably won't have any issues anyways.
Any who, my counters started out as a very light gray Formica. They were about as blah as blah can get. But our house is just a starter home and we know that we have no intention on staying for the long term. On top of that, it's just not in our budget to replace all the counters anyways.
So I started looking up alternatives and what I found was granite paint. Giani's granite paint to be exact. The stuff looked awesome and so lifelike! I knew I had to try it.
But when I really started thinking about it, I would have needed 2 kits just to do my kitchen. And at $80 bucks a pop that wasn't exactly cheap. So it was back to the drawing board. I did some more research and found that there were lots of bloggers out there who came up with their own versions of granite paint for a fraction of the cost. After reading tutorial after tutorial I decided to give it a shot. I mean, my counters couldn't get much worse. I say that, but if they had somehow ended up worse, I probably would have cried. A lot. Because I would have had to look at even uglier counters everyday.
If you're interested you can find the tutorials that I found most helpful here and here.
And a few pictures of the before. Please ignore the crappy lighting, jacked up walls and the multiple bottles of wine I have stashed. As I'm sure you noticed I still haven't finished painting my cabinets. Words can't express how much I hate painting cabinets at this point.


Step 1:
Prep

What you need:
Brillo Pads
Razor Blade
Wet Rag
Painters Tape
Plastic and/or Brown Masking Paper
Never underestimate good prepping. I've done it too many times and lived to regret it. With this project I literally took a good 2 hours just to prep. First, I moved everything off the counter tops and found a temporary home for all of it. It takes a good week to 2 weeks of letting the polycrylic cure before anything heavy can be placed back on them. I taped off my wall with some mesh tape where the Sheetrock was tore up. I then gave the tops a quick once over with a wet cloth.
From there I took a razor blade and scraped away all the gunked up caulk leftover from when we tore out the hideous purple tile back splash. If you are painting your back splash as well and you are 100% sure the pre-existing caulk is paint-able then you can skip this step. However if you're not sure, its best to remove it and replace with paint-able caulk.
Once all the caulk was removed, I wet a Brillo pad and scoured the counter tops really, really good. I wanted to be sure there was no kind of grime or grease leftover whatsoever. I then gave the counters another good wipe down with my wet cloth and dried it really well.
I grabbed my trusty sanding block and lightly sanded the tops to give the primer something to stick to. I'm a big fan of sanding blocks but you can use whatever sand paper you like. I put plastic over my stove and the top of my dishwasher to be on the safe side and also took some cheap brown paper and covered the tops of my cabinets to protect them from possible paint splatters. The only thing I really needed to worry about taping off was my sink, but be sure to tape off your walls and anywhere else you don't want paint to get to.

And finally, the prep work is done! (took you long enough)
Step 2:
Priming
What you need:
Tintable Primer
Foam Brushes
4 Inch Foam Roller
Nobody really likes this step (do they? not me) but I have good news. Your primer will actually serve as your base coat too. Yay for time saving! I used Zinsser's PrimeCoat 2 (only $15 bucks a gallon!) and had the good folks at Home Depot tint it to Behr's Jasper Cane. Yep, they can do that.

However, if you are wanting to use black as your base coat, you will have to do this in two different steps. The man in the paint department told me they can only tint primer to a light color.If that's the route you want to go down I would prime as normal and then use a black acrylic paint over the top of it.
I used cheap foam brushes to cut in around where the counters met the wall, and then used a 4 inch foam roller to paint the rest. It worked great and gave a very smooth finish. Don't freak if it initially looks kind of bubbly (this happened to me, and I did. Freak that is.). It will level out. Also, you may need 2 coats to really cover the existing color of your counters.
At this point, it was 2 am, I was a bit delirious and I started to panic thinking that the color looked too peachy (not in a good way, like...literally). So I called it a night to let the primer dry for a good 8 hours.
Step 3:
Sea sponge and acrylic
What you need:
Acrylic Paints
Sea Sponge
Paper Plates
When I woke up the next morning, I lay there contemplating what I was gonna do with my big, peach mess. I knew if I didn't love it, it was just gonna have to go because I'm one of those people. It would bug me everyday till the day we sold the house. I walked in the kitchen with my eyes closed, took a deep breath, and opened them.


The primer was fine! It had dried to more of a light beige which was what I was going for. I heaved a sigh of relief and trudged on.
To achieve the granite look I used 6 different acrylic paints that I found at Michael's. Here are the exact brands and color names:
Americana Multi-Surface Metallic: Chocolate and Champagne
Craft Smart: Vanilla, Black, Espresso and Golden Brown

I used paper plates and poured a little puddle of paint on each one. This makes for super simple clean up and keeps the colors from getting all mixed together.

I grabbed my sea sponge (I got mine at Michael's but Home Depot has a nicer one for a little more on their paint aisle) and tore it into 6 different pieces. I began with my darkest color and just started dabbing it on the counters. There is really no wrong way to do this part, it really just consists of continuing to layer the colors until you achieve a look that you like.


Here are a few tips though.
Don't work in too much of a pattern. Random is easier anyways and works just fine for this!
Don't be shy! I can't say this enough; layer, layer, layer! It took me forever to do my first section of counters because I was over thinking it too much and only doing little dabs of each color at a time. I was terrified I was going to mess it up. I'll let you in on a little secret though.
You can't mess this up!
Trust me, if there was a way I would have figured it out. Slop those paint layers on lady (or dude) and you'll notice that in the end it really gives you way more of a 3 dimensional look.


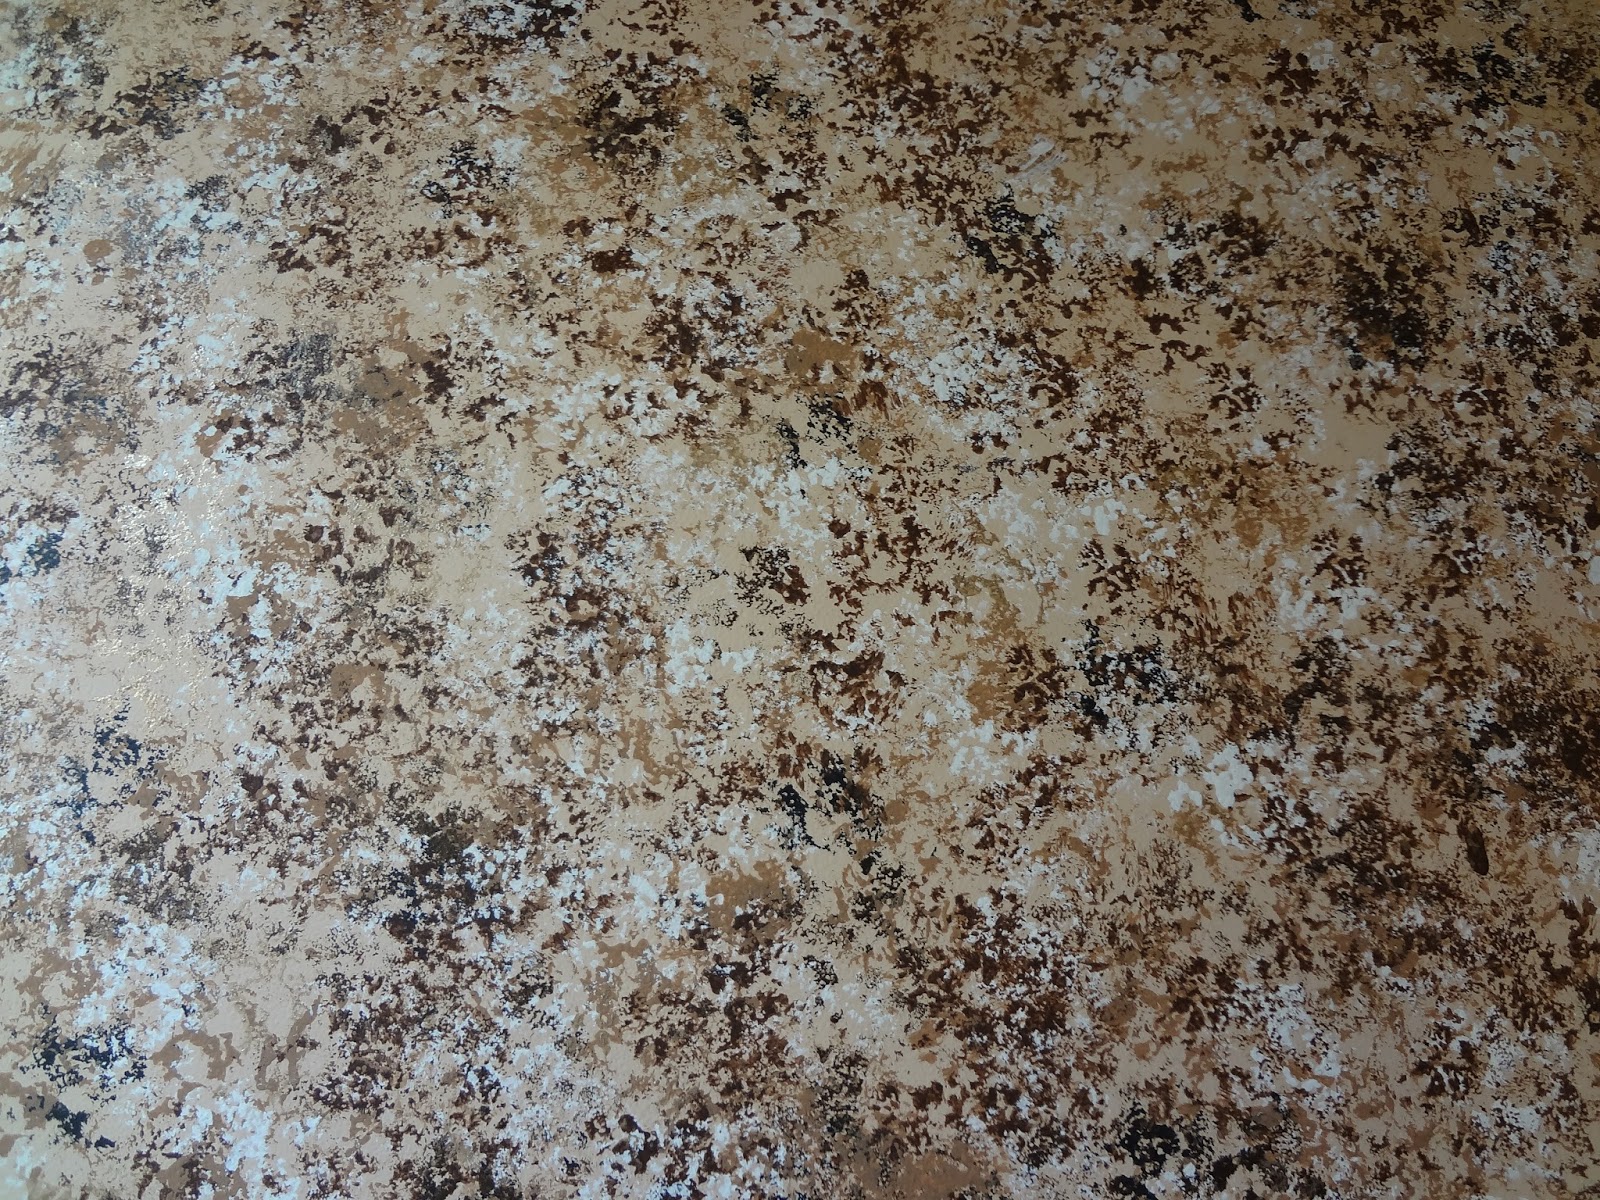
Here are a few close ups of the pattern once I was done adding all the layers.


Step 4:
Sealing
What you need:
Polycrylic
Foam Brushes
And so we come to the step in the process that has me a little bummed out; sealing your beautiful work of counter top art. Chances are, if you have read any other tutorials that have to do with sealing granite paint with polycrylic you'll find no mention of them ending up with a streaky mess. And if you read the comments on those tutorials it goes something like this:
Blog Commenter: Wow, what beautiful counter tops! You made it look so easy I just had to give it a try, however now I have a big STREAKY mess. What am I doing wrong?!
Blogger: Hmmmmm, weird! I must live in a magical world where projects never, ever go wrong because I didn't have that problem AT ALL. It was so easy. I'm not sure what you did wrong but better luck next time!
Ok, that's just my bitterness talking. In all actuality they are a lot more sympathetic and helpful than that, but you catch my drift. It's disheartening when it feels like you are the only person in the world managing to screw something up.
While I haven't fully remedied this issue I can tell you some of the stuff that I learned that helped mine turn out better than it could have. Feel free to use whichever technique you feel best for this part, but this is just what worked best for me.
The streaking comes into play when you overwork the product. This stuff dries QUICK and if you start going over it again once its started to dry, well, you are going to get streaks in your finish.
Basically what I mean is most of your surface will be beautiful and glossy but will be marred with matte, un-glossy streaks. If light doesn't really directly hit your counter tops, chances are you wont even see them.
Its really hard to avoid this though because its tough to determine where you've already applied a clear coat and you also have to somewhat overlap the strokes. I personally used a 3 inch foam brush to apply my polycrylic (I tried a brush as well but I just really didn't like it).
Work really quickly, sweep the foam brush from the wall to the edge of the counter top for each stroke, and keep your coats thin for the first 5-6 coats. Don't get caught up on it if you notice its kind of streaky at this point because you will need 8-10 coats total. Let it sit for about an hour between coats and then use a green scotch brite pad to lightly sand down. (You can find these with the sandpaper and they are about 2.70 for 2 pads. I liked them way better than sand paper for this.)
Once you start getting down to your last coats I would thicken them up some. This helped me cut down on the streaks a lot. I dipped my foam brush in the polycrylic and pulled it out over the counter without tapping off the excess. Even it out best you can but don't go back over a section more than twice. It's hard not to (I think this was my main issue) but the polycrylic will level, so as long as you don't leave big globs it shouldn't be a problem.
Let the thicker layers dry for at least 2 hours in between coats.
And then as mentioned earlier, you will want to let your new counters cure for at least a week before putting anything back on them.
(They'll be much glossier than this, these pictures were taken after the first coat)
.jpg)


I hope this tutorial helps, and I'll be glad to answer any questions I didn't cover in the comments below.
Overall, they turned out better than I could have hoped and I love, love, love them! My total cost was only around $100 bucks and other than needing to buy more cheap acrylic paints, I should have enough materials to do all the counters in my house. (A little tip, if you only have a small space you are wanting to try this on you can save a lot by just getting the quart size primer and polycrylic. My cost is based on gallon size)
Stay tuned for a solution to the streaking problem though, because the perfectionist in me is pretty darned determine to find one.


